Setup Azure Active Directory for a Native Application
When the itrezzo Unified Contact Manager runs as an on-premise application, it can be configured to access the Azure Active Directory using the Graph API.This blog post shows the steps required to configure an Azure AD Native Application so that it can authenticate and access the GAL (Global Address List).
Setting up the Office 365 Tenant to use Azure AD
Using the Graph API connector does take a several steps. The first requirement is to enable Azure AD Management from the Office 365 Admin console.
To get started, open your Office 365 tenant admin. Scroll to the bottom of the navigation pane and open the ADMIN container, Select Azure AD.

Office 365 Admin Menu
Note: If your tenant has not been previously setup to use the Azure AD Management console, you will go through a series of steps to get it initialized for first time use.
After the Azure AD Management Console is launched, you should see your tenant listed.

Click on the tenant name to open it.

Now click on the applications menu (1), choose ADD red circle (2) at the bottom to add a new application.

At present, itrezzo does not have an application in the gallery. Select “Add an application my organization is developing” as your on-premise application.

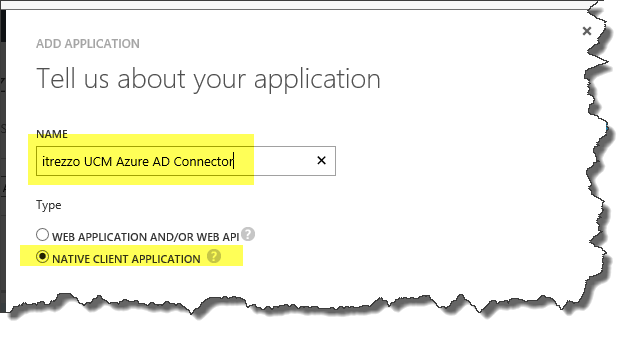
A suggested name is shown below. Enter the application name and choose Native Application.

I suggest setting the application redirect URI to the internal URL of your itrezzo UCM server.. This setting will not affect application performance but upon some future review of Azure UCM applications, it will document where the on-premise application resides.

You will see the following message upon completion. Click the CONFIGURE menu as shown by the red arrow.

The application “itrezzo UCM azure AD connector” properties will open. There are two things to do on this page:
- Copy the CLIENT ID to the clipboard.
- Configure Active Directory access rights for this app.

After saving the Client ID to the Clipboard, open and paste into Notepad. You will need this when you configure the on-premise application.
Scroll to the bottom of the page where the “permissions to other applications” is located (1).
Set Delegated Permissions as shown (2) so that the itrezzo UCM application can “Read Directory Data”, “Enable SSO” and “Access your organization’s directory”.

How to get the Tenant ID from the Azure Management Console URL
It is likely that you will need one more piece of information when you configure the on-premise application. That information is called the Tenant ID.
The easiest way I know to get the tenant ID is from the end of URL when you are managing Azure AD. There is a 32 digit hex code after the Directory keyword. Copy it to the clipboard and paste it to the Notepad for use later.

Note: When you setup Graph API access, the login credentials for a Tenant Admin should be used.
I also suggest reading the companion post titled: Sync Office 365 GAL to Outlook.